Advanced Joining Methods For Todays Vehicle
This article originally appeared in the November 2014 edition of ABRN.
When friends and family think about the vehicles of yesteryear they often say to me "they don't build them like they used to." I tell them, you have no idea how right you are. Cars today are light years ahead of where they were just a few short years ago. It is no longer vehicles of the future we are discussing, but current vehicles on the road today, and some are being repaired like nothing has changed. With the major changes in vehicle construction, the collision repair industry will need to learn some advanced attachment methods and a new way of thinking. Lets take a look at some advanced attachment methods necessary for repair on vehicles that are on the road today.
MIG Brazing
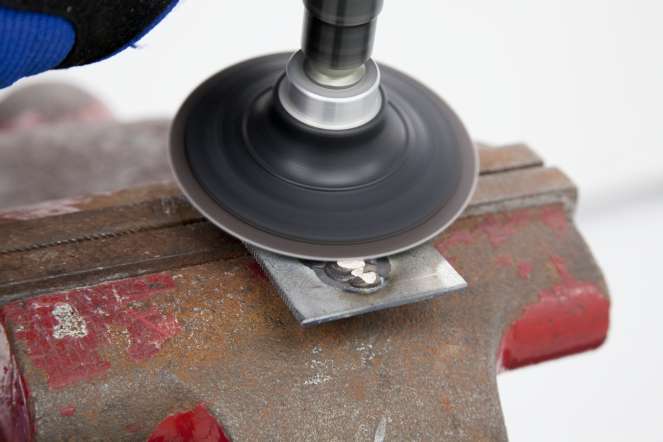
MIG brazing is used for many different reasons. It can be used to make continuous weld joints on panels where warping, or overheating heat-sensitive materials are a concern. MIG brazing is also used to make slot welds when attaching heat-sensitive materials, and where recommended in vehicle maker repair information. Most of the MIG brazed joints are used to attach a lower strength steel part to a higher strength steel part that is heat sensitive. Another benefit of MIG brazing is that it is softer than steel, allowing it to be more easily shaped and finished. (See Figure 1)
The MIG brazing wire tensile strength is approximately 275–350 MPa but the MIG brazed joint may be stronger than that if done correctly, due to the thickness of the bead on the backside.
The filler metal, which is usually silicon bronze, melts at a lower temperature than the steel base metal. (As a side note, MIG brazing cannot be used on aluminum panels because silicon bronze melts at a higher temperature than aluminum.) The molten filler metal is drawn into the joint by capillary action. In order to have a successful repair when MIG brazing, capillary action is required for a strong joint. Capillary action is the process in which the molten filler metal wicks or spreads out along the backside of the repair joint. The filler metal then bonds to the base metal.
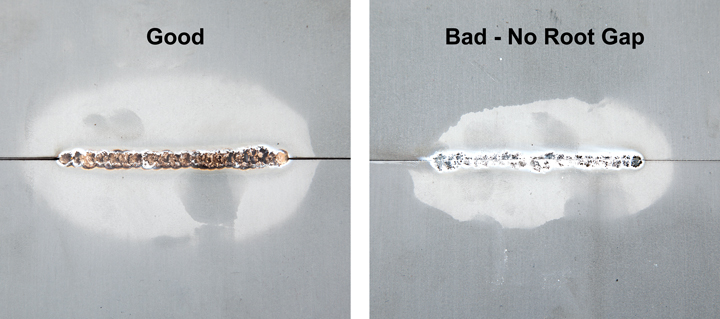 Figure 2 - Without the correct root gap capillary action will not occur.
When you make MIG braze joints, try using a manual stitch to control the heat affect zone (HAZ). This technique works well when using a GMA welder that has silicon bronze wire instead of steel wire. There are some machines that have a preprogrammed setting for MIG brazing. These machines also have adjustments for electrode size, material thickness, and electrode alloy. The goal on an open butt joint is to create a weld bead on the backside that is almost indistinguishable from the front side bead. (See Figure 2)
The natural tendency when someone starts to MIG braze is to turn up the welder in order to get the bead to look the same as when GMA welding. This is both unnecessary and detrimental to the repair joint. It will dramatically increase the HAZ, and still may not provide the proper amount of capillary action.
Another critical part of MIG brazing is to keep the proper root gap to ensure that the brazed joint is strong. If the root gap is too small, there will not be enough capillary action taking place. When the front side is ground down, the weld bead on the backside is the only thing that is providing strength to the repair joint.
Just like with GMA welds, you must visually inspect and destructively test practice welds. When inspecting practice welds, look for tearout around the brazed joint the same way as when testing GMA welds. Another destructive test that should be done is the grind destructive test. To do the test, make a weld and grind the front side level with the surface. Then, destructively test the weld. This test will verify that the joint has sufficient capillary action.
Aluminum Welding
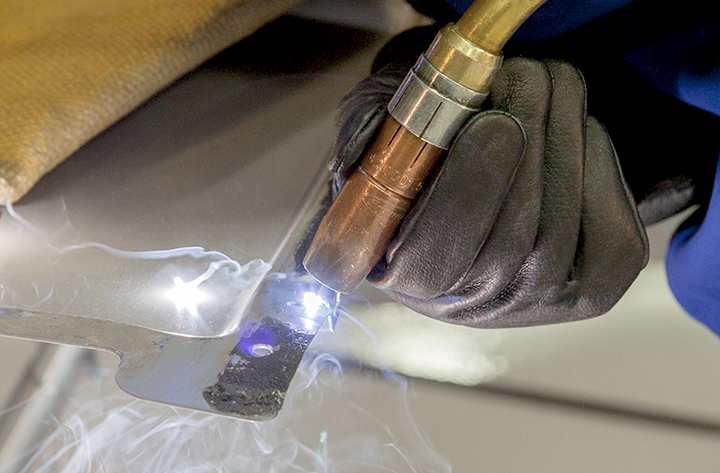 Figure 3 - This pulse welder is creating a quality weld bead.
Next let’s take a look at aluminum welding. For some of the luxury vehicle repair facilities, welding aluminum is nothing new, but for many it is virtually an unknown. First thing that is needed is the right equipment. Most of the vehicle makers require a welder that is capable of welding in the pulse mode. (Check with each vehicle maker requirements for full details.) (See Figure 3)
The next thing that will be needed is training and practice. Aluminum welding is far less forgiving than traditional steel welding. When aluminum welding, surface preparation is absolutely critical to a successful weld. Aluminum, once exposed to air, almost instantly forms an aluminum oxide layer. This non-conductive aluminum oxide layer is extremely hard, has a higher melting temperature than aluminum, and will cause extremely bad welds due to porosity. (See Figure 4)
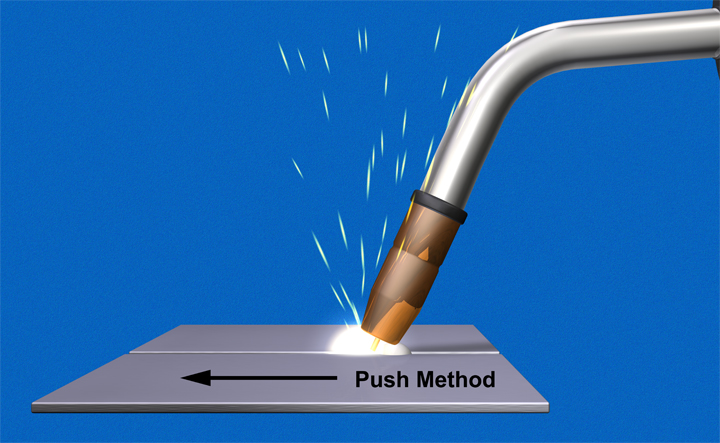 Figure 4 - When aluminum welding, the push technique must be used to create a strong weld.
If there are any deficiencies in welding technique, aluminum welding will show it in the form of a bad weld. This is where training and practice are going to be key. With steel GMA welding, you can push or pull the weld puddle, and have some success with either method. But with aluminum you have to push the weld puddle. This will preheat the panel ahead of the weld, which will keep a stable arc and allow the shielding gas to protect the welding zone from outside contaminants.
Rivet Bonding
The final attachment method we will look at is rivet bonding, with the main focus being self-piercing rivet (SPR) bonding. This again is not new to those that repair steel and aluminum luxury vehicles. But for the rest of the industry, it is a new concept. The good news is with some new pieces of equipment, and some training, you will have what you need. With rivet bonding, there are some similarities to squeeze-type resistance spot weld (STRSW) bonding that will be familiar.
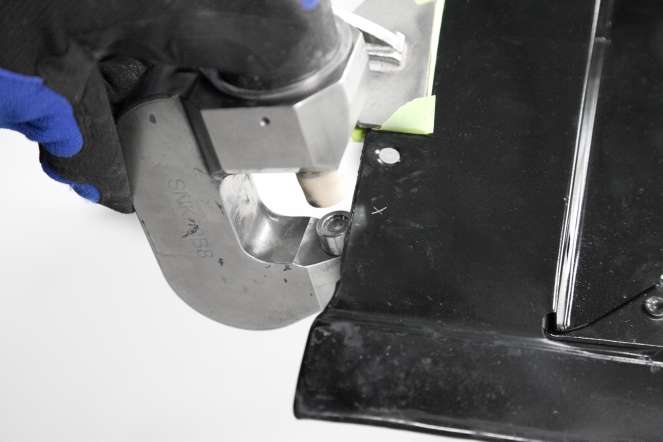 Figure 5 - This SPR gun is installing replacement rivets.
The similarities are that panel fit up and flange preparation must be a top priority for a successful repair. The jaws of a spot welder will not correct panel misalignment, neither will an SPR gun. If the panels do not align, it will cause a poor quality repair. Also, the flange preparation is critical, so the adhesive can properly attach the panels. And as always, do not forget to prepare the adhesive cartridge following product maker instructions to ensure proper curing of the adhesive. (See Figure 5)
Now, lets look at the required equipment; the main tool that will be needed is a SPR gun. The types of vehicles you are repairing will help determine which gun is needed, the types (blind rivets are often used in conjunction with SPRs) and size of SPRs, and any accessories that are needed for the SPR gun. (Look at the vehicle maker repair information for more details) On the jaws of the SPR gun, there are several different die sets that will be needed, some are used to extract previously installed SPRs, and some to install new SPRs. (See Figure 6)
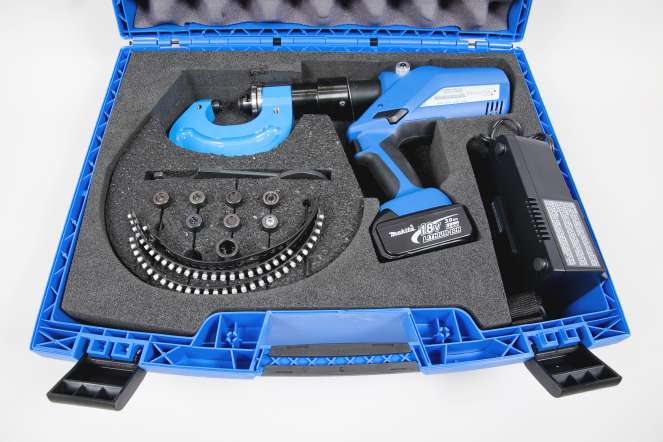 Figure 6 - This is one of many SPR gun kits that are available.
The final piece of this puzzle is selecting the correct size and type of rivet. The length of the SPR or blind rivet must be matched to the panel thicknesses that are being joined. An SPR that is too long will not form correctly and could leave a hole in the backside of the panel, while one that is too short will not form correctly creating a weak spot in the repair and could cause a repair failure. The best way to determine which SPR is required is to follow vehicle maker repair procedures.
Conclusion
Repairs on today’s complex vehicles are not the repairs of yesteryear. The vast combinations of materials and joining methods from the vehicle maker require the collision repair industry to update their tools, equipment, techniques, training, and thought process. If the industry does not adapt to this new world, complete and safe repairs will become part of yesteryear as well.
Additional I-CAR Collision Repair News you may find helpful:
Related I-CAR Courses
Article validated in 2024
-
Toyota/Lexus/Scion Position Statement: Pre- and Post-Repair System Scanning
Thursday, 28 July 2016
As the industry continues to ask if pre- and post-repair system scanning is necessary, Toyota/Lexus/Scion provides their answer.
-
Pre- and Post-Repair System Scanning Statements
Wednesday, 9 January 2019
Are you wondering if a particular OEM or organization has a published statement on pre-repair and post-repair scanning? We have compiled a list of most of the statements on the subject, so you can...
-
ADAS, Calibration, And Scanning Article Hotspot
Monday, 14 January 2019
Since advanced driver assistance systems (ADAS), scanning, and calibration first started becoming relevant, members of the collision repair industry have required as much knowledge as possible on...
-
BMW Position Statement: Pre- and Post-Repair System Scanning - UPDATE
Friday, 10 April 2020
BMW has released a position statement related to pre- and post-repair system scanning. The statement applies to All vehicles equipped with on board diagnostics II (OBD II).
-
Honda/Acura Position Statement: Pre- and Post-Repair System Scanning - UPDATE
Wednesday, 22 May 2019
Honda /Acura has updated their position statement on pre- and post-repair scanning to give more clarification on what is expected for scanning.
-
Quickly Identifying Outer Quarter Panels w/Rolled Hem Flanges
Monday, 5 March 2018
The I-CAR best practice article, Recycled Outer Quarter Panels w/Rolled Hem Flanges has gotten a lot of interest from the collision repair industry. It’s important to know which vehicles are...
-
General Motors Position Statement: Pre- and Post-Repair System Scanning
Friday, 21 October 2016
As the industry continues to ask, are pre- and post-repair scans necessary, General Motors provides their answer.
-
Restraints Wiring Repairs
Monday, 23 May 2016
Over the past few months, we've been sharing OEM position statements on restraints wiring repairs. Now we're bringing them all together in one place for easy reference.
-
FCA/Stellantis Position Statement: Pre- and Post-Repair System Scanning
Thursday, 9 June 2016
FCA/Stellantis has released a position statement related to pre- and post-repair system scanning.
-
Typical Calibration Requirements For Forward Radar Sensors
Wednesday, 12 October 2016
Technicians should be aware of what’s required to keep advanced driver assistance systems (ADAS) running safely after a collision. Whether that be aiming a camera, which can cause a system to not...
-
I-CAR Just In Time: Digital Tram Gauge Basics And Steering Column Measurement Tips
Thursday, 19 February 2026
Sometimes seeing is understanding, that’s why I-CAR's technical team created the Just in Time video series to guide you through a variety of collision repair topics from ADAS and EVs to repair tips...
-
GM Repair Insights: Fall 2025
Tuesday, 17 February 2026
The fall edition of General Motors (GM) Repair Insights magazine is now available.
-
GM Repair Insights: Winter 2026
Tuesday, 17 February 2026
The winter edition of General Motors (GM) Repair Insights magazine is now available.
-
SEMA 2025: Three-Dimensional Measuring Presentations
Thursday, 12 February 2026
I-CAR had numerous presentations at the 2025 SEMA show. Two presentations featured information about three-dimensional measuring of vehicles.
-
Body Repair Manual Symbols: Ford/Lincoln
Wednesday, 11 February 2026
While looking at repair procedures in a body repair manual (BRM) you may notice that symbols are used to indicate specific operations or parts to be used during the repair process. Most BRMs provide a...
-
I-CAR Repairers Realm: I-CAR Registered Apprenticeship Program - Coming Soon
Monday, 9 February 2026
I-CAR is having a discussion on the Registered Apprenticeship Program (RAP).
-
SEMA 2025: Lucid Motors Body Repair Team - The New Gravity SUV
Friday, 6 February 2026
I-CAR had numerous presentations at the 2025 SEMA show. One of these presentations focuses on Lucid Motors Gravity SUV repair information.
-
Calibration Research Tips: Blind Spot Indicator In Side Mirrors
Wednesday, 4 February 2026
While searching for information on advanced driver assistance systems (ADAS) on an OEM repair information site, you may come across unique calibration procedures or events. These events can vary by...
-
Bumper Cover Repair With ADAS: BMW/Mini - UPDATE
Tuesday, 3 February 2026
A simple bumper repair on a modern vehicle may not be as simple as it seems. New technologies like blind spot monitoring, adaptive cruise control, and other advanced driver assistance systems (ADAS)...
-
Hyundai/Genesis Part Replacement Without A Procedure
Thursday, 29 January 2026
We are often asked, “What do I do if there isn’t a procedure to replace a service part?” Let’s see what Hyundai/Genesis says.
- 2026
- February 2026 (9)
- January 2026 (11)
- 2025
- December 2025 (8)
- November 2025 (11)
- October 2025 (13)
- September 2025 (11)
- August 2025 (12)
- July 2025 (11)
- June 2025 (11)
- May 2025 (11)
- April 2025 (13)
- March 2025 (12)
- February 2025 (11)
- January 2025 (12)
- 2024
- December 2024 (8)
- November 2024 (10)
- October 2024 (13)
- September 2024 (10)
- August 2024 (12)
- July 2024 (11)
- June 2024 (9)
- May 2024 (13)
- April 2024 (12)
- March 2024 (12)
- February 2024 (12)
- January 2024 (9)
- 2023
- December 2023 (8)
- November 2023 (12)
- October 2023 (11)
- September 2023 (11)
- August 2023 (12)
- July 2023 (9)
- June 2023 (11)
- May 2023 (12)
- April 2023 (11)
- March 2023 (12)
- February 2023 (10)
- January 2023 (11)
- 2022
- December 2022 (11)
- November 2022 (12)
- October 2022 (11)
- September 2022 (13)
- August 2022 (11)
- July 2022 (10)
- June 2022 (13)
- May 2022 (11)
- April 2022 (12)
- March 2022 (10)
- February 2022 (11)
- January 2022 (13)
- 2021
- December 2021 (13)
- November 2021 (11)
- October 2021 (13)
- September 2021 (14)
- August 2021 (12)
- July 2021 (15)
- June 2021 (17)
- May 2021 (11)
- April 2021 (14)
- March 2021 (20)
- February 2021 (14)
- January 2021 (14)
- 2020
- December 2020 (13)
- November 2020 (17)
- October 2020 (12)
- September 2020 (14)
- August 2020 (11)
- July 2020 (18)
- June 2020 (14)
- May 2020 (14)
- April 2020 (19)
- March 2020 (12)
- February 2020 (13)
- January 2020 (14)
- 2019
- December 2019 (13)
- November 2019 (19)
- October 2019 (25)
- September 2019 (20)
- August 2019 (22)
- July 2019 (23)
- June 2019 (20)
- May 2019 (19)
- April 2019 (20)
- March 2019 (20)
- February 2019 (18)
- January 2019 (17)
- 2018
- December 2018 (18)
- November 2018 (19)
- October 2018 (17)
- September 2018 (16)
- August 2018 (21)
- July 2018 (20)
- June 2018 (21)
- May 2018 (16)
- April 2018 (19)
- March 2018 (21)
- February 2018 (15)
- January 2018 (20)
- 2017
- December 2017 (13)
- November 2017 (15)
- October 2017 (19)
- September 2017 (20)
- August 2017 (19)
- July 2017 (18)
- June 2017 (19)
- May 2017 (18)
- April 2017 (13)
- March 2017 (18)
- February 2017 (10)
- January 2017 (11)
- 2016
- December 2016 (9)
- November 2016 (14)
- October 2016 (21)
- September 2016 (10)
- August 2016 (11)
- July 2016 (8)
- June 2016 (10)
- May 2016 (5)
- April 2016 (11)
- March 2016 (12)
- February 2016 (10)
- January 2016 (8)
- 2015
- December 2015 (9)
- November 2015 (6)
- October 2015 (8)
- September 2015 (7)
- August 2015 (11)
- July 2015 (7)
- June 2015 (5)
- May 2015 (7)
- April 2015 (8)
- March 2015 (8)
- February 2015 (9)
- January 2015 (10)
- 2014
- December 2014 (12)
- November 2014 (7)
- October 2014 (11)
- September 2014 (10)
- August 2014 (9)
- July 2014 (12)
- June 2014 (9)
- May 2014 (12)
- April 2014 (9)
- March 2014 (6)
- February 2014 (1)
- January 2014 (26)
