


Common Mistakes: Panel Bonding

When it comes to panel bonding, there are some common mistakes that can have a huge impact on the strength and quality of the repair.
The first common mistake that people make is not properly cleaning the area where the panel bond is to be applied. It's important to use the recommended cleaner/degreaser prior to adhesive application to ensure there are no contaminants that can cause an adhesion failure or premature corrosion in the area.
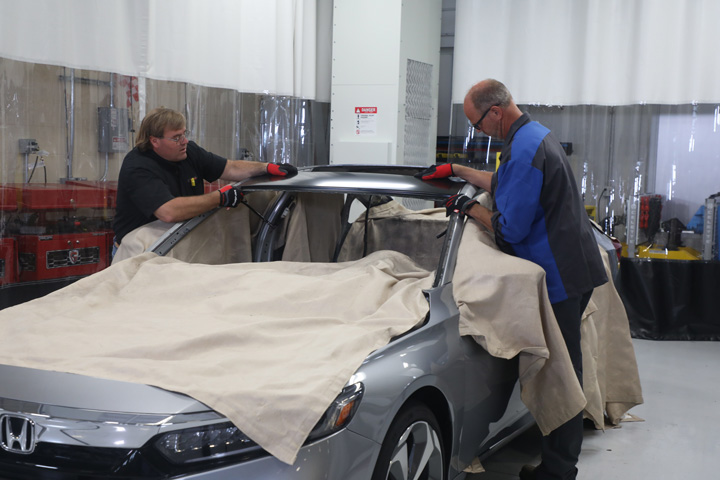
The next mistake that is commonly made occurs while positioning the replacement part. If repositioning of the part is needed, it is important to slide the part. Do not pick up the part and separate the adhesive. Lifting the panel introduces and traps air in the adhesive, weakening it at those points. Most panel bond manufacturers cover this in the technical data sheets (TDS) for the product.
- Per 3M training material: "Do not lift the panel because air pockets could form in the adhesive between the replacement panel and the vehicle."
- Per SEM: "If the panel must be repositioned, slide it instead of lifting to prevent creating air pockets."
- Per Lord Fusor: “After the panel has been positioned, do not pull it away from the vehicle. If repositioning is necessary, slide the panels against one another. This maintains contact between the two surfaces.”
- Per Plio Grip: "Align the new panel in place, and apply even pressure. After the panel has been positioned, do not pull away from the vehicle. If repositioning is required, slide the panels against one another to ensure no air is trapped in the bond line."
- Per Kent: "Place the panel in position immediately; slide to realign if needed. Do not separate."
- Per IES: "When repositioning, slide the panel. Never lift the panel when repositioning."
Panel bonding adhesives are used on vehicles more than ever. It’s crucial that the materials are used and handled properly. Which includes following the manufactures TDS and the OEM procedures.
Related I-CAR Courses
-
Toyota/Lexus/Scion Position Statement: Pre- and Post-Repair System Scanning
Thursday, 28 July 2016
As the industry continues to ask if pre- and post-repair system scanning is necessary, Toyota/Lexus/Scion provides their answer.
-
Pre- and Post-Repair System Scanning Position Statements
Wednesday, 9 January 2019
Are you wondering if a particular OEM or organization has a published position statement on pre-repair and post-repair scanning? We have compiled a list of most of the position statements on the...
-
ADAS, Calibration, And Scanning Article Hotspot
Monday, 14 January 2019
Since advanced driver assistance systems (ADAS), scanning, and calibration first started becoming relevant, members of the collision repair industry have required as much knowledge as possible on...
-
Honda/Acura Position Statement: Pre- and Post-Repair System Scanning - UPDATE
Wednesday, 22 May 2019
Honda /Acura has updated their position statement on pre- and post-repair scanning to give more clarification on what is expected for scanning.
-
Restraints Wiring Repairs
Monday, 23 May 2016
Over the past few months, we've been sharing OEM position statements on restraints wiring repairs. Now we're bringing them all together in one place for easy reference.
-
Typical Calibration Requirements For Blind Spot Sensors
Wednesday, 19 October 2016
Technicians should be aware of what’s required to keep advanced driver assistance systems (ADAS) running safely after a collision. Whether that be aiming a camera, which can cause a system to not...
-
Typical Calibration Requirements For Forward Radar Sensors
Wednesday, 12 October 2016
Technicians should be aware of what’s required to keep advanced driver assistance systems (ADAS) running safely after a collision. Whether that be aiming a camera, which can cause a system to not...
-
General Motors Position Statement: Pre- and Post-Repair System Scanning
Friday, 21 October 2016
As the industry continues to ask, are pre- and post-repair scans necessary, General Motors provides their answer.
-
FCA/Stellantis Position Statement: Pre- and Post-Repair System Scanning
Thursday, 9 June 2016
FCA/Stellantis has released a position statement related to pre- and post-repair system scanning.
-
Quickly Identifying Outer Quarter Panels w/Rolled Hem Flanges
Monday, 5 March 2018
The I-CAR best practice article, Recycled Outer Quarter Panels w/Rolled Hem Flanges has gotten a lot of interest from the collision repair industry. It’s important to know which vehicles are...
-
I-CAR Just In Time: Lineman’s Glove Testing
Tuesday, 7 May 2024
Sometimes seeing is understanding, that’s why I-CAR's technical team created the Just in Time video series to guide you through a variety of collision repair topics from ADAS and EVs to repair tips...
-
OEM Emergency Response Guides: BMW/Mini
Thursday, 2 May 2024
Are you looking for OEM emergency response guides (ERGs)? The Repairability Technical Support (RTS) team has located these guides and either houses them on the RTS website, provides links to...
-
I-CAR Ford Mach-E Collision Repair And Electromechanical Repair Courses
Wednesday, 1 May 2024
I-CAR has developed courses for the Ford Mustang Mach-E, a general collision repair overview and a course that covers electromechanical repair.
-
I-CAR Repairers Realm: Controlling Static During Refinishing - Now Available
Tuesday, 30 April 2024
I-CAR had a discussion on controlling static during refinishing.
-
Film Thickness Gauge For Plastic Parts - Is It Worth The Investment?
Friday, 26 April 2024
Film thickness gauges continue to be a valuable tool in the collision industry. Most shops have gauges that work with both ferrous and non-ferrous substrates. So, should shops invest in a film...
-
Body Shop Business: EV Intake Process
Wednesday, 24 April 2024
Body Shop Business has released an article highlighting the importance of the electric vehicle (EV) intake process.
-
Repairer Driven News: Matte Clearcoat Challenges
Monday, 22 April 2024
Repairer Driven News (RDN) has released an article highlighting the challenges of matte and semi-gloss clearcoat.
-
I-CAR Just In Time: EV Repair Tips
Wednesday, 17 April 2024
Sometimes seeing is understanding, that’s why I-CAR's technical team created the Just in Time video series to guide you through a variety of collision repair topics from ADAS and EVs to repair tips...
-
I-CAR RTS App
Monday, 15 April 2024
Looking for another tool for your toolbox? An informational guide at your fingertips? Well, the I-CAR Repairability Technical Support (RTS) app is what you are looking for!
-
Repairer Driven News: ADAS Radar Optimized Paint Color Resources
Friday, 12 April 2024
Changes in advanced driver assistance systems (ADAS) radar technology are introducing new refinishing considerations. Paint film thickness not only may affect the performance of ADAS radars, color...
- 2024
- May 2024 (3)
- April 2024 (12)
- March 2024 (12)
- February 2024 (12)
- January 2024 (10)
- 2023
- December 2023 (8)
- November 2023 (13)
- October 2023 (11)
- September 2023 (11)
- August 2023 (12)
- July 2023 (9)
- June 2023 (12)
- May 2023 (12)
- April 2023 (11)
- March 2023 (12)
- February 2023 (10)
- January 2023 (11)
- 2022
- December 2022 (11)
- November 2022 (12)
- October 2022 (11)
- September 2022 (13)
- August 2022 (11)
- July 2022 (10)
- June 2022 (13)
- May 2022 (11)
- April 2022 (12)
- March 2022 (10)
- February 2022 (11)
- January 2022 (13)
- 2021
- December 2021 (13)
- November 2021 (12)
- October 2021 (13)
- September 2021 (15)
- August 2021 (12)
- July 2021 (15)
- June 2021 (17)
- May 2021 (14)
- April 2021 (14)
- March 2021 (21)
- February 2021 (15)
- January 2021 (14)
- 2020
- December 2020 (13)
- November 2020 (17)
- October 2020 (12)
- September 2020 (14)
- August 2020 (11)
- July 2020 (18)
- June 2020 (16)
- May 2020 (14)
- April 2020 (20)
- March 2020 (12)
- February 2020 (14)
- January 2020 (14)
- 2019
- December 2019 (13)
- November 2019 (19)
- October 2019 (25)
- September 2019 (20)
- August 2019 (22)
- July 2019 (23)
- June 2019 (21)
- May 2019 (19)
- April 2019 (20)
- March 2019 (21)
- February 2019 (21)
- January 2019 (18)
- 2018
- December 2018 (19)
- November 2018 (19)
- October 2018 (17)
- September 2018 (16)
- August 2018 (21)
- July 2018 (20)
- June 2018 (21)
- May 2018 (17)
- April 2018 (19)
- March 2018 (22)
- February 2018 (16)
- January 2018 (20)
- 2017
- December 2017 (13)
- November 2017 (15)
- October 2017 (19)
- September 2017 (20)
- August 2017 (20)
- July 2017 (18)
- June 2017 (23)
- May 2017 (20)
- April 2017 (14)
- March 2017 (18)
- February 2017 (11)
- January 2017 (13)
- 2016
- December 2016 (9)
- November 2016 (14)
- October 2016 (21)
- September 2016 (11)
- August 2016 (11)
- July 2016 (8)
- June 2016 (13)
- May 2016 (10)
- April 2016 (11)
- March 2016 (12)
- February 2016 (11)
- January 2016 (8)
- 2015
- December 2015 (9)
- November 2015 (8)
- October 2015 (9)
- September 2015 (7)
- August 2015 (11)
- July 2015 (10)
- June 2015 (8)
- May 2015 (8)
- April 2015 (9)
- March 2015 (8)
- February 2015 (9)
- January 2015 (10)
- 2014
- December 2014 (12)
- November 2014 (7)
- October 2014 (11)
- September 2014 (10)
- August 2014 (9)
- July 2014 (12)
- June 2014 (9)
- May 2014 (14)
- April 2014 (9)
- March 2014 (6)
- February 2014 (1)
- January 2014 (27)